Repeating controls functionality in PowerApps can be achieved using Gallery Control of PowerApps.
Repeating control functionality can be useful in many scenarios. For Instance, you can add multiple products in data source, you can add multiple clients’ details in Data Source.
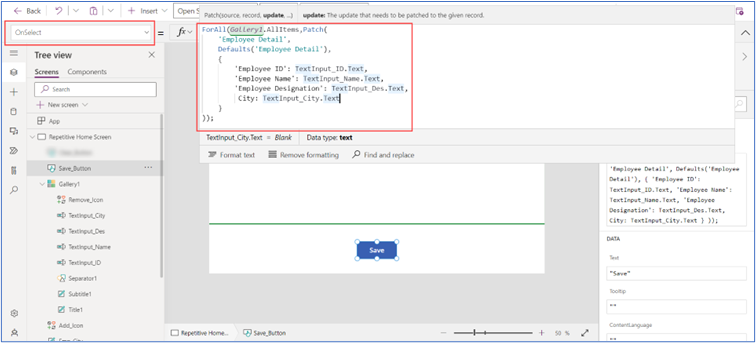
In this article using repeating control feature we will save data of multiple employees in SharePoint List. In this example we will only use text input control. But we can use any control inside gallery for repeating control functionality.
Now let’s start building the solution for Repeating Control in PowerApps.
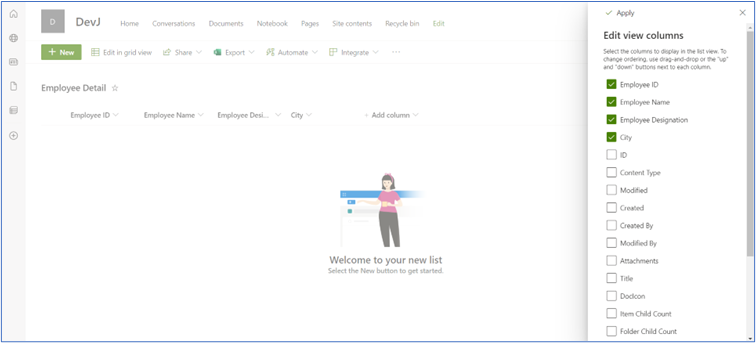
Create SharePoint List
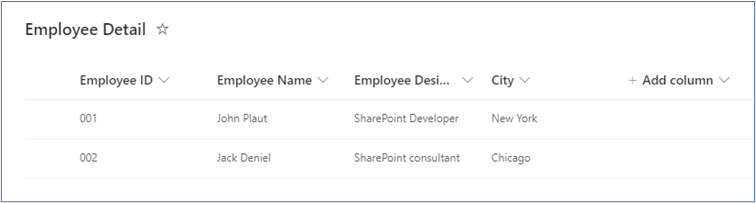
Create “Employee Detail” list and create following columns:
Column Name
Column Field
Employee ID
Number
Employee Name
Single line of text
Employee Designation
Single line of text
City
Single line of text
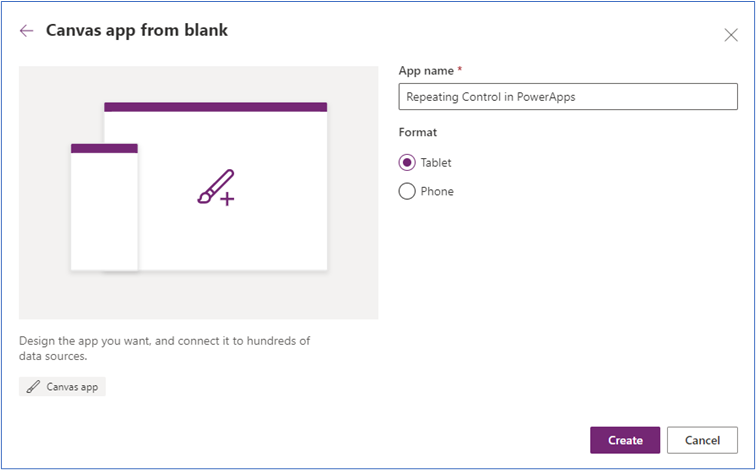
Create PowerApps
Step 1: Create new canvas app.
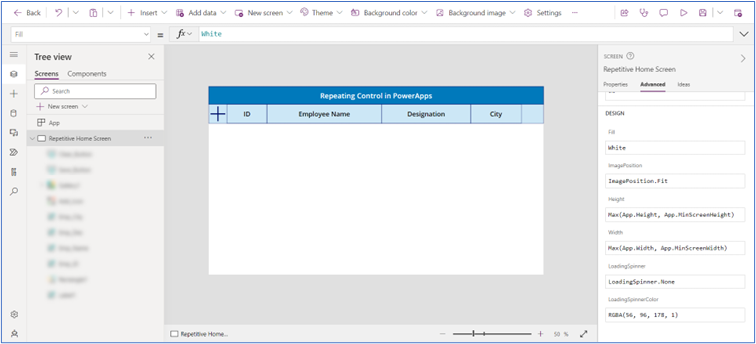
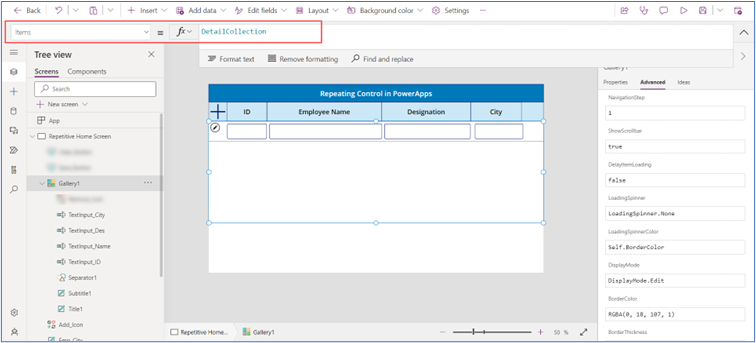
Step 2: Add Label controls for the heading purposes in the screen that looks like as below and add “+” icon in the first column.
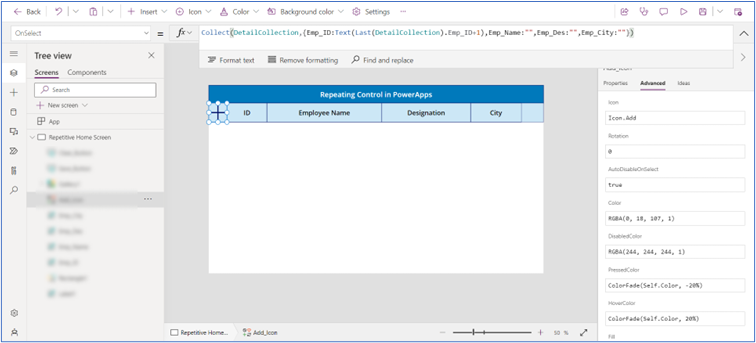
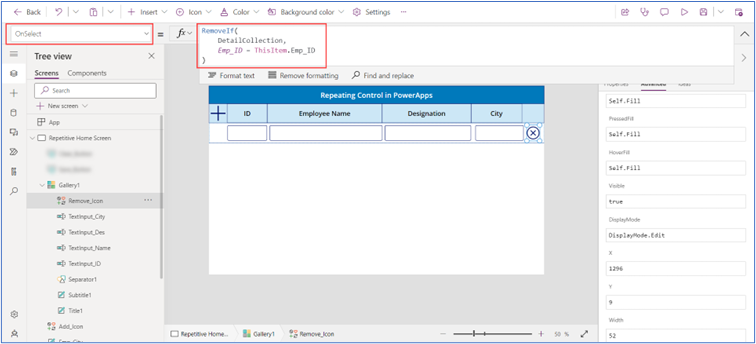
Step 3: After adding “+” icon set its “OnSelect” property as below:
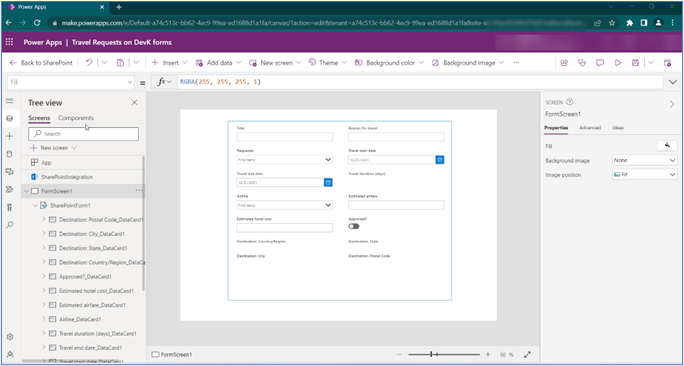
If we want to change the style of our DataCardKeys and DataCardValues in a Power Apps Form, then we must update the style of each of them one by one.
In this article we will see how we can update the properties (Font Size, Color, Fill) of multiple form controls (DataCardKeys and DataCardValues) altogether.
Let’s Start with the Power app form for the here the example we have taken the customize power apps forms, but the same trick will apply on the Power apps canvas application form.
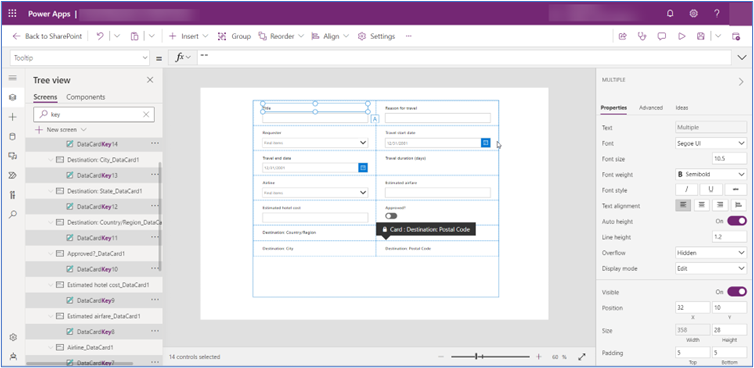
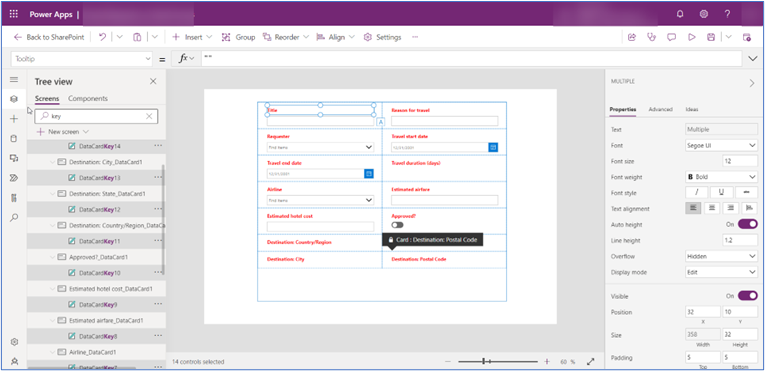
Here the few steps to select multiselect control from to different data card.
1. Select the Power Apps form in the tree view
Now Click Select the form in this scenario we are using SharePoint Form because this is customization form.
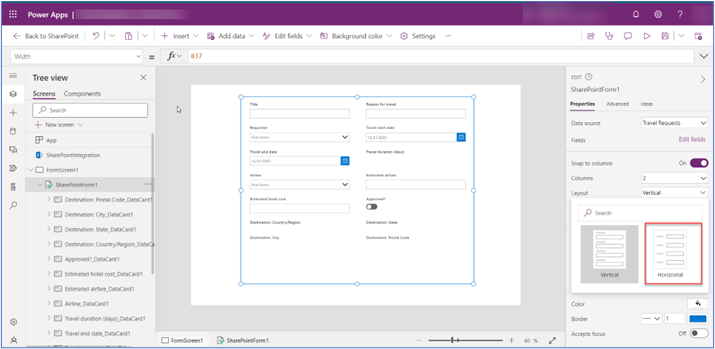
2. Change the form layout property from vertical to horizontal
This section will demonstrate how to change the layout. To do this, first go to the right-pane, and select the Layout dropdown. Going through the list of layouts, find one fitting your needs. In this example, we will choose Horizontal.
3. Click the undo button
This trick only works if we click the undo button in the top right corner. Pressing Ctrl+Z to undo does not have the same effect.
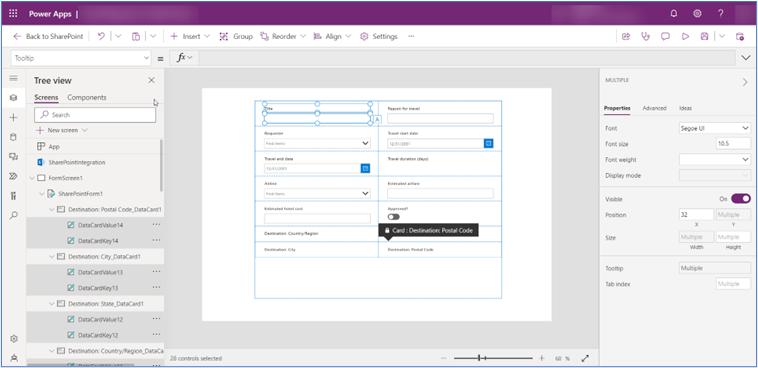
4. Now all DataCardKeys and DataCardValues in the form are selected
This section shows a single form with multiple datacardValues and datacardKeys. The data card contains one or more dropdown list, radio buttons, checkboxes etc. By design, we can see the data card is selected and there are multiple controls inside each of the form’s data card.
5. Use the Tree View search to quickly unselect either the keys or values
Now, based on your requirement you can Press the ctrl button and you can deselect the control based on your requirement so if you want to change the DataCardValue property then you can unselect the DataCardKey it’s up to you if you want to selected Specific DataCardValue you can select that and changed the property based on your desired outcome.
6. Change any property of the remaining selected controls in one-click.
In this section, we can see how to make the many changes quickly as per the requirement DataCardKeys or DataCardValues in the DataCard.
In our requirement we want to increase the font size for all DatacardKey text in red color and Font Weight bold as well.
Here you can change the multiple selected control height, width, color padding, hover effect etc based on the requirement.
This tricks also work same as the canvas app form.
A Deep link is one type of hyperlink that send an app user to a specific record or screen. When a new record is added to a SharePoint list, a hyperlink will be sent for the submitted record through email. In this blog post, I have shown the steps for how to send an email with deep links that immediately open Power Apps to a specific record or screen.
Now let’s start building the solution for deep links email direct link to specific record.
Introduction: Create an Issue Tracker App
We will create one PowerApp for generate issue tracker through app and request send to help desk. After sending request help desk will resolve issue for requested user.
Setup The SharePoint List
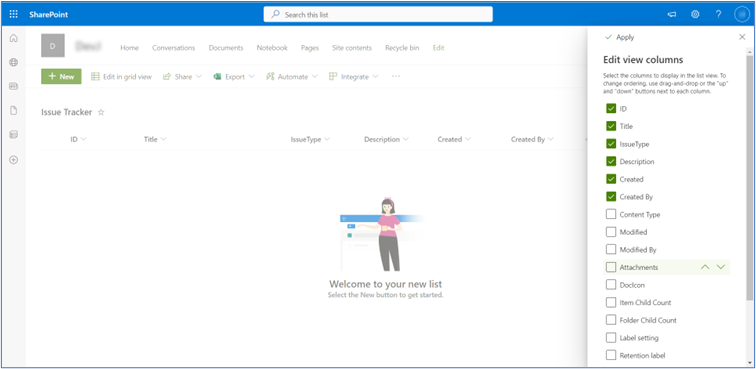
First create SharePoint list for requested user request with the following columns:
Add necessary columns in created SharePoint list below shown in image.
Edit form in PowerApps
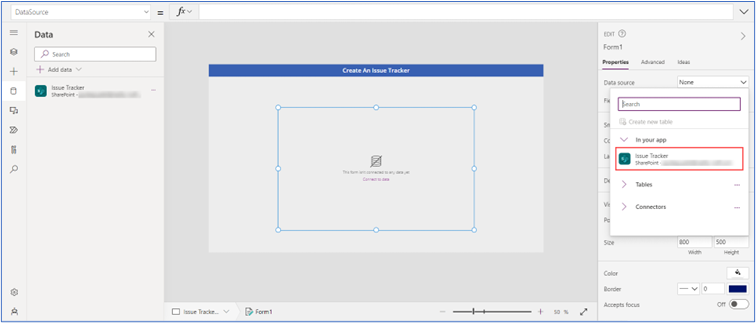
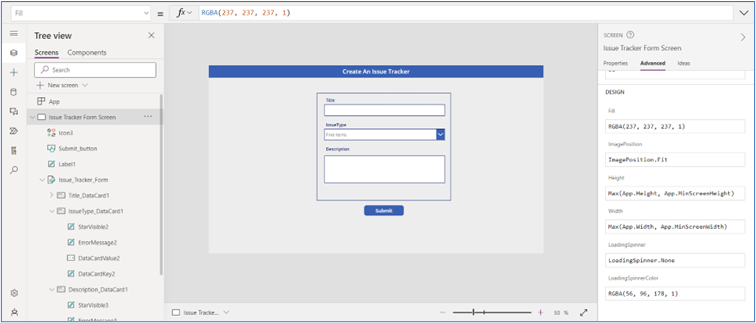
Let’s create one canvas app for create issue tracker for new user. Add one label and connect data source then add SharePoint list (which created in SharePoint site)
After adding data source take one “Edit Form” and connect SharePoint list as data source.
Add Title, Issue Type and Description fields in the form and delete unnecessary fields.
Change the DefaultMode as “new” because, when we will submit form then new record will added to the SharePoint list.
“FormMode.New”
Submit Button For The Edit Form
Now, insert a new button below the form with the text “Submit”. Add this code in the OnSelect property of the form to submit the form details to the SharePoint list.
“SubmitForm(Issue_Tracker_Form)”
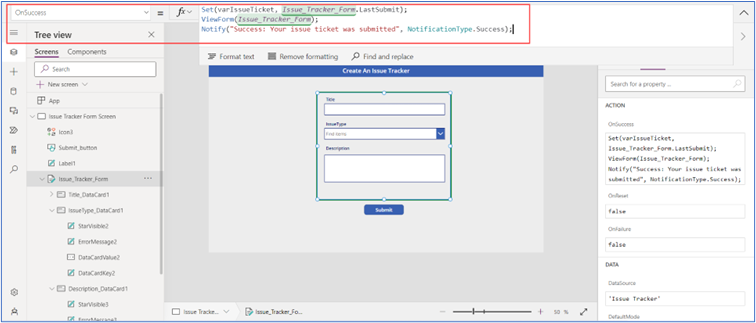
Then add this code to the OnSuccess property of the form to define what happens after the new ticket is successfully created. We want to capture the ticket details in a variable called varIssueTicket, change the form to view-mode and then show a banner at the top of the screen to let the user know their ticket was saved.
“Set(varIssueTicket, Issue_Tracker_Form.LastSubmit);
ViewForm(Issue_Tracker_Form);
Notify("Success: Your issue ticket was submitted", NotificationType.Success);”
Put variable name on Item property of form
“varIssueTicket”
Use this code on Visible property of the submit button to hide it after the ticket is submitted.
“Issue_Tracker_Form.Mode<>FormMode.View”
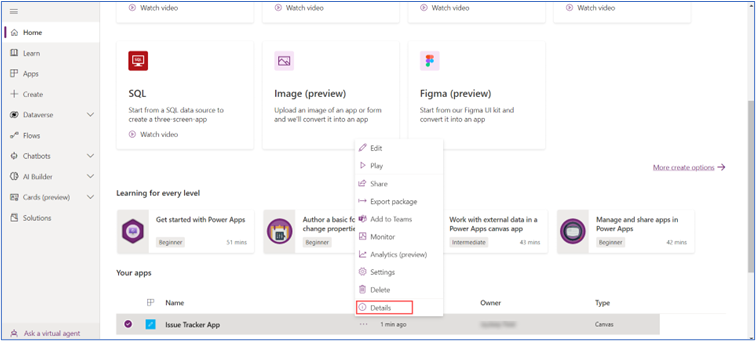
Get the PowerApps URL
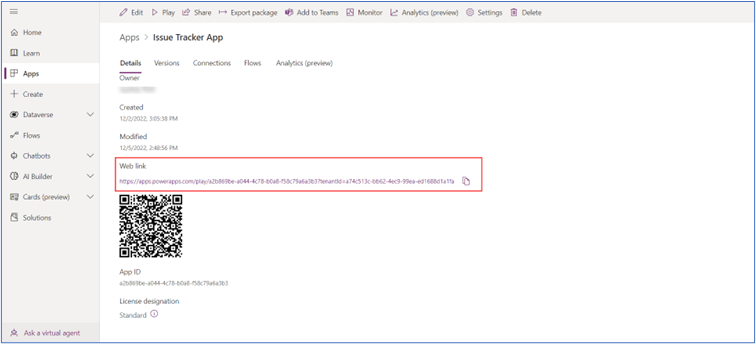
Now generate link to the submitted ticket we must first obtain the app’s web link.
Copy “Web link” into notepad. We will need it in Power Automate flow action.
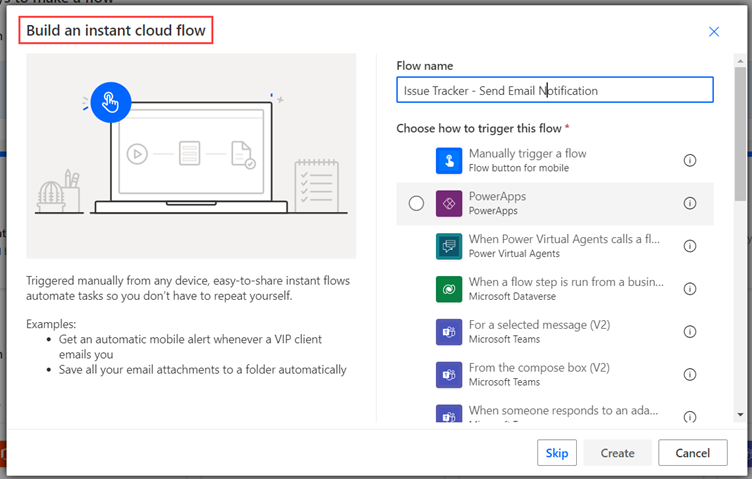
Send Deep Link in Email using Power Automate
After submitting user request through powerapp help desk will receive an email with direct link. Go to the Power Automate and build one cloud flow will send email to helpdesk for submitted request. Choose “When an item is created” for the trigger.
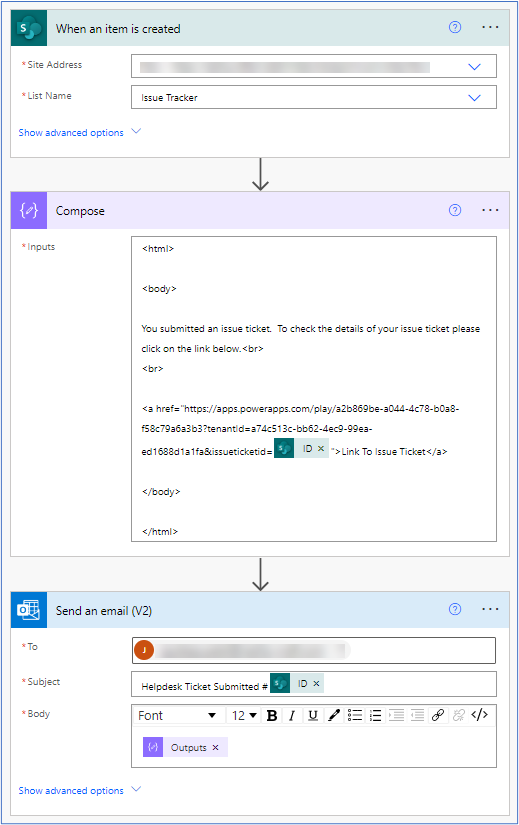
Add two actions in the flow: “Compose” and “Send An email V2(Outlook)”.
In the compose step of the flow we are writing HTML code to insert into the body of the notification email. We take the web link for the app and add a URL parameter called issueticketid. This parameter is filled with the unique ID number from theSharePoint list.
“<html>
<body>
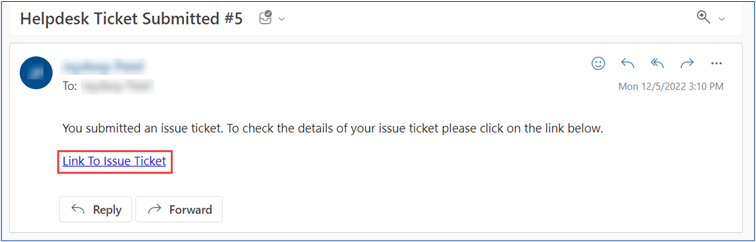
You submitted an issue ticket. To check the details of your issue ticket please click on the link below.<br>
<br>
<a href="https://apps.powerapps.com/play/a2b869be-a044-4c78-b0a8-f58c79a6a3b3?tenantId=a74c513c-bb62-4ec9-99ea-ed1688d1a1fa&issueticketid=@{triggerOutputs()?['body/ID']}">Link To Issue Ticket</a>
</body>
</html>”
After add html code in compose action then add send email action put output in body section then save the flow.
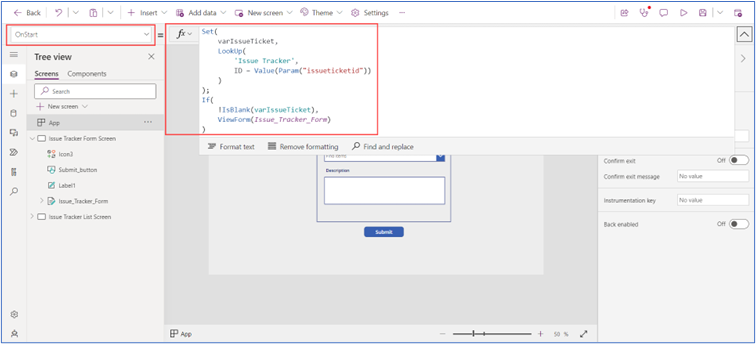
Get Item ID in App OnStart Property
When the app opens it must check whether a record ID was supplied inside the issueticketid URL parameter. If issueticketid has a value, the form should display that record, otherwise, it will appear blank.
Use this code in the OnStart property of the app. It performs a lookup on the issueticketid URL parameter and stores the result in the varIssueTicket variable. If a record was found it changes the form to view mode (instead of new mode which is the default we setup earlier).
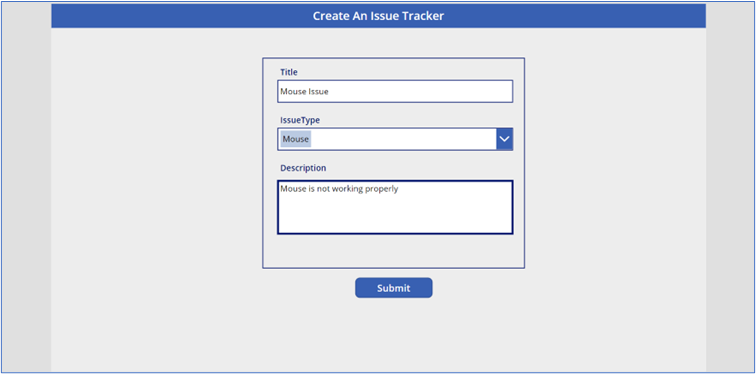
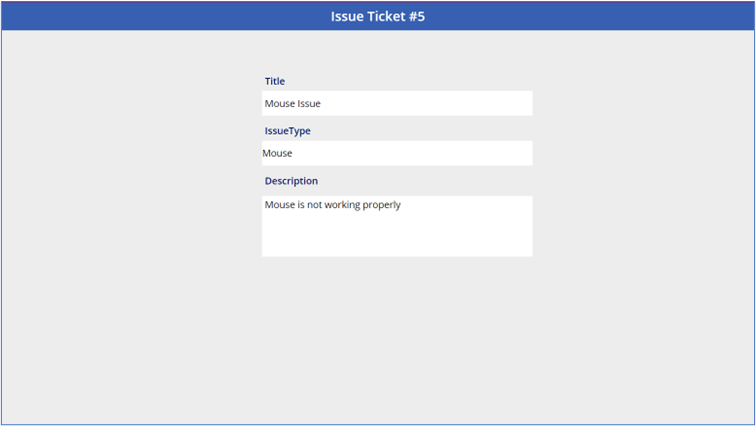
When the form is in new mode the titlebar will show the text “Create An Issue Tracker”, otherwise, it will display the ticket ID number. Use this code in the Text property of the titlebar.
“If(Issue_Tracker_Form.Mode=FormMode.New,"Create An Issue Tracker","Issue Ticket #"&varIssueTicket.ID)”
Submit Form To Send An Email
Now test the app first fill the form which is created in powerapps, after submitting form email sent though direct link to the submitted record.
After submitting form waiting for few moments and an email will appear with direct link to issue ticket record. Click on the link mention in email.
When we click on the link app open with the form in view-mode and display the issue ticket details.
Dealing with the date is very headache for some time specially for calculate the business days excluding weekends is very tuff for some time and most of the business power apps calculating the business days between two days is a common feature.
For the Calculate the date fist we get all dates and filtering the weekends and holidays. There is not the direct solution or function available to calculating the number of business days.
This article will help you to calculating the number of business days.
Introduction: The Leave Requests App
The Leave Requests App is used by employees at a financial services firm to ask for the vacation sick leave for paid time off.
For the Leave Request Apps need to be much information like leave status, Approval name Employee Department etc. but here our agenda is the calculated number of businesses days so here we take only necessary columns.
Setup A SharePoint list for leave Requests
Create a new SharePoint list called Leave Requests with the following columns:
Employee Name (People Picker)
Start Date (date only)
End Date (date only)
Number Of Days (number)
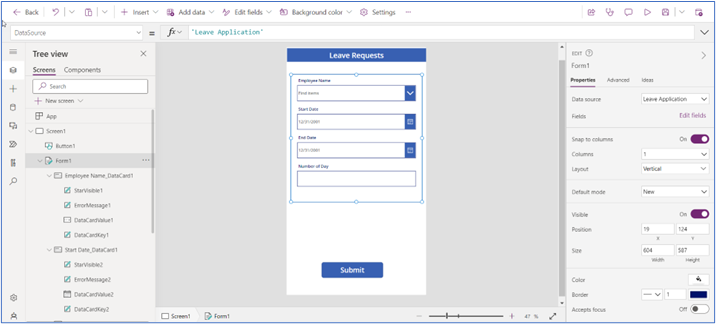
Create A New Canvas App in Power Apps Studio
Create new app from blank.
Insert the Edit form and add button on the screen
Connect the form with Data Source as Leave Requests.
After the adding data source in edit form. Now you can add the number of days data card to make it view only.
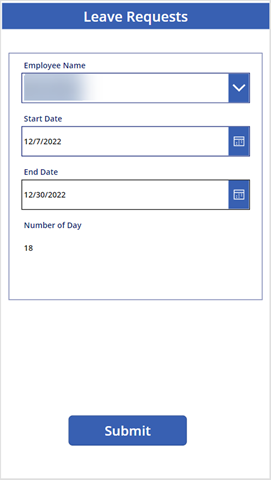
Calculate The Number of Business Days Excluding Weekends in Power Apps
When Employee enter the Leave request Start Date and End date into the power apps form. For the business day means the Monday – Friday weekdays and not the Company holidays.
Now we can start the calculate number of business day excluding the weekends.
For calculating we can use With function and Sequence function for calculating business days.
Just overview of With function: With holds the value from these functions long enough to be used in further calculations or actions.
Sequence function: This function is generated single columns table of Sequence numbers like 1,2,3. The name of the column is Value.
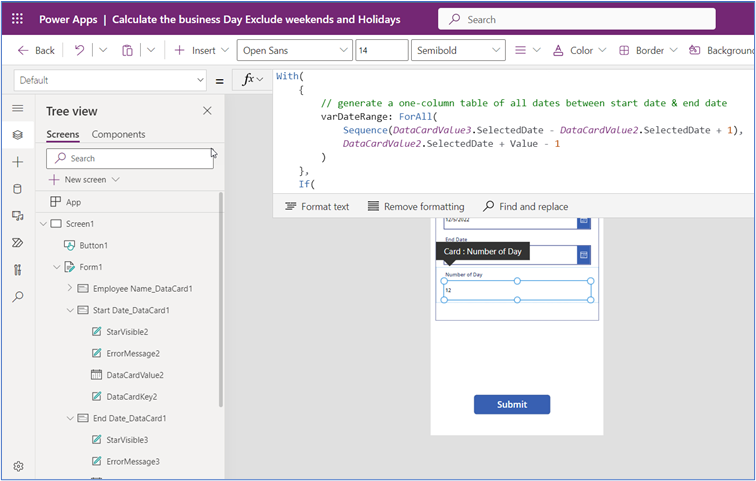
With (
    {
        // generate a one-column table of all dates between start date & end date
        varDateRange: ForAll(
            Sequence (DataCardValue3.SelectedDate - DataCardValue2.SelectedDate + 1),
            DataCardValue2.SelectedDate + Value - 1
        )
    },
    If(
        And (
            IsBlank(DataCardValue2.SelectedDate),
            IsBlank(DataCardValue3.SelectedDate)
        ),
        // show nothing if any date pickers are blank
        0,
        // include only dates Monday to Friday
        CountIf(
            varDateRange,
            Weekday (Value) in [2, 3, 4, 5, 6]
        )
    )
)
Setup A SharePoint List for Holiday Calendars
For the business day calculation, we need to exclude the holidays. So first we capture the number of holidays for the based on the region. For the capturing the holidays we create one list to store all holidays list called “US Holiday List” with the below listed columns.
Title (single-line text)
Holiday Day (date only)
Title
Holiday Day
New Year’s Day
01-01-2022
Epiphany
01-06-2022
Valentine’s Day
2/14/2022
Presidents’ Day
2/21/2022
Employee Appreciation Day
03-04-2022
How to exclude holiday from the business days calculation in power apps
Now we have added the data source with power apps
We have already added the calculate business days excluding weekends, so we have enhanced the logic.
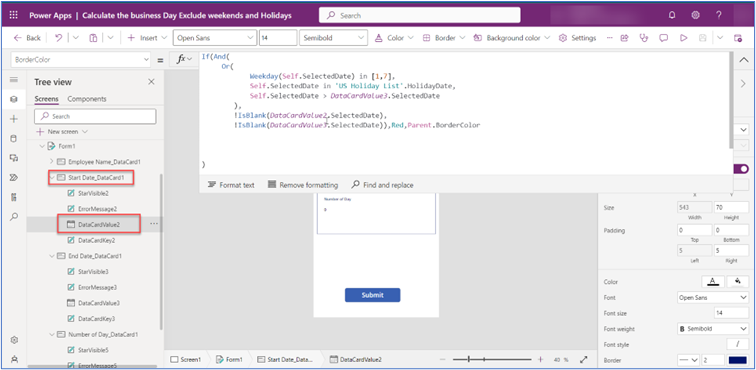
Now we can add the logic on the Default property of the Number of Days DatacardValue. If the holiday date is found within the single columns table being generated it does not get counted in the results.
Write the below code in the default property of the Number of Days DataCard Value.
With (
    {
        // generate a one-column table of all dates between start date & end date
        varDateRange: ForAll(
            Sequence (DataCardValue3.SelectedDate - DataCardValue2.SelectedDate + 1),
            DataCardValue2.SelectedDate + Value - 1
        )
    },
    If (
        And (
            IsBlank(DataCardValue2.SelectedDate),
            IsBlank(DataCardValue3.SelectedDate)
        ),
        // show nothing if any date pickers are blank
        0,
        // include only dates Monday to Friday
        CountIf(
            varDateRange,
            Weekday (Value) in [2, 3, 4, 5, 6], Not (Value in 'US Holiday List'.HolidayDate)
        )
    )
)
For the validate start date & End date are not on Weekends or Holidays for check the
below Criteria.
The date is not a weekend day (Saturday, Sunday)
The date is not a holiday
The start date must be before the end date
Both a start date and an end date must be selected
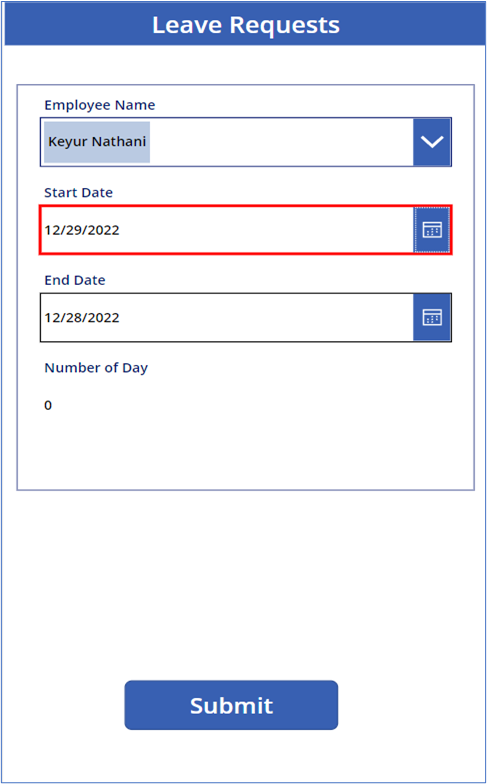
For this validate we can add the border colour property of the Start Date picker.
Wire the below code on the start date datacard border colour.
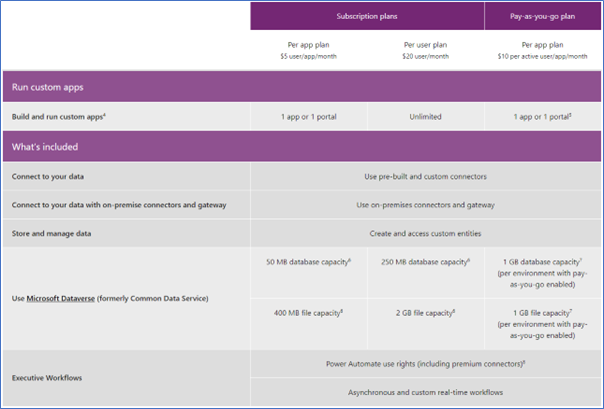
Power Apps premium license is required only if your application utilize some premium features! If not, Microsoft 365 license will be enough.
Using premium license, you can connect many of the premium connectors. Few examples are as below.
Microsoft Dataverse
SQL
Custom Connector
Azure App Service
Docusign
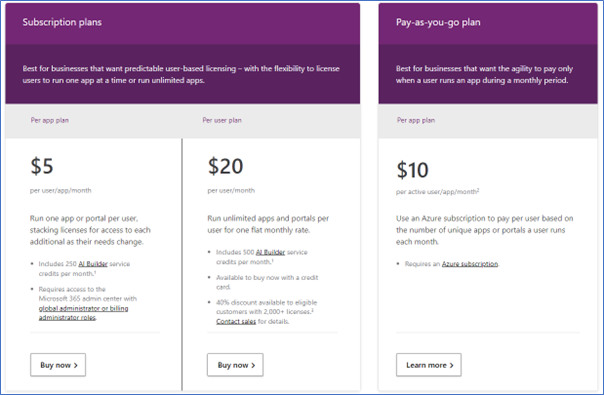
Premium License types in PowerApps
1. Per App Plan
2. Per User Plan
3. Pay As you go Plan
Per App Plan
Power Apps per app plan is actually a per-user-per-app.
So, you must buy one “per App” license for each single application user and user provided with this type of license can work with Power Apps premium feature with one app for one month. If licenses are assigned to the app, you can’t use it for other apps, because they were already assigned. You must buy more if you want to use this kind of license for different app.
User
Environment 1
Per app licenses consumed
User 1
App A
App B
2
User 2
App A
App B
Portal 2
3
User 3
App A
1
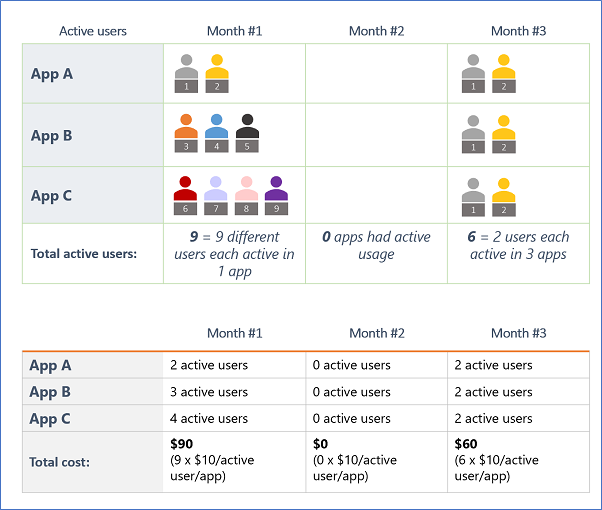
Sharing an app with a user consumes the per app capacity.
Each user is required to have a license to run an app.
E.g.
100 Users want to access 1 PowerApps with premium feature.
Cost: (Number of users*Per Apps License Cost) * No of Apps
Cost: (100*$5) *1= $500/Month
PowerApps Per User Plan
This plan is straightforward. By purchasing and assigning this plan you guarantee access to Power Apps premium features to one user. So, the name is accurate in this example. One license for one user.
One license cost $20 per month.
E.g.
100 Users want to access all PowerApps across tenant with premium feature.
Cost: (Number of users*Per Apps License Cost)
Cost: (100*$20) = $2000/Month
Pay As you go Plan
This plan is something different. It is assigned to the environment, not to a User. Pay-as-you-go plan, like Power Apps per User/App plans allows users to utilize premium feature of Power Apps, Power Automate and Dataverse.
Pay-as-you-go plan is assigned to the environment, so consequently it is assigned to every app hosted on this environment. It means that every activity on each application for each user without a license will count as usage, so it will be charged.
If you will assign pay-as-you-go plan to the environment and you will create an app utilizing premium features, you will be charged 10$ per each user using this app – per month. 1 application run by a user is enough to charge you 10$. Here is Microsoft statement from a documentation.
Microsoft calculate the cost of pay as you go plan as below.